Tuesday 7 December 2010

Week Six - Interaction ProtoType (Continuation)

Multiple Object Menu Prototype and Map Development

Weekly Targets

  • Create a limited menu system offering different objects to simulate the menu system in the final version
  • Redesign and finalise the Map

Thursday 2 December 2010

Week Five - Interaction ProtoType

Adding and removing objects

Adding Objects

First Problem, no built in drag and drop classes in away3d, had to make my own.


Removing Objects


Saving Objects


Monday 22 November 2010

Week Four - Map Design and Garden Design

Map Design and Map Development

Weekly Targets

  • To finalise the Map design, including the location panels.
  • To begin the first draft\ Mock up for the design of the user Garden 

User Garden Design 

Before beginning the initial design process of the user 3d garden i decided to look for inspiration on the Internet.  I have already decided i want the user to design there gardens to one of either two styles. Inside a pre set area that basically looks like an empty garden, keeping it to true to life. Or depicting a garden as a planet and taking a slightly more abstract approach to it.

The first image that caught my attention was a garden made through knitting and stitching techniques using wool and cotton. As a pre set approach this looks  exactly how i imagine the garden would look and even the angle at which this photo was taken is similar to the maximum angle i would want the user to be able to move the camera to.

A 3d garden made entirely of wool and cotton using knitting and stitching

I would also want the the user to be able to explore there garden by toggling through different camera angles. So the user would be able to position themselves inside there garden to see there creation in greater detail. Similar to the following images


Close up of one corner of the knitted garden

Close up of another corner of the knitted garden

The alternate approach would be to set up the users garden as a world or planet. And having a sort of  god like creation feel to it were the user can simply rotate the world they've been given and simply add objects to it.

There is currently a British gas advertisement campaign running on British television depicting everyone owning a home on there own little planet. I like the idea of creating an environment that mimics this theme, of being able to create your garden on your own little planet.

British Gas advert with indivdual homes on indvidual planets

Another example of this would be from a game developed mainly for the Nintendo Wii called Mario Galaxy which uses a similar sort of style to the British gas advert using small island sized worlds shaped and styled into miniature sized landscapes.


Two more screenshots taken from the same game showing Mario interacting with the miniature sized worlds that make up the content in Mario galaxy. These screenshots generally look like small planet sized gardens, with the multi coloured flowers and the rockery, which also form part of the content I'm offering the user in my own project.

A globe shaped object with multi coloured flowers applied to it from Mario Galaxy

Another globe shaped planet from Mario Galaxy, with numerous amounts of multi coloured flowers applied to it
These two images taken from the second installment of Mario Galaxy again show miniature sized islands but in this case shaped as both a torus and a cube. This has given me an idea of how i might further develop an aspect of the project perhaps offering the user the option to create different shaped gardens instead of just  using the sphere shaped globe.


A torus shaped object used in Mario galaxy which looks slightly like a miniature sized garden

A cube shaped object used in Mario galaxy with hedge rows and grass applied to it

Deciding on the planet approach

Having looked at other concepts of design online, in games and as illustrations both digital and free hand i have decided to use the "planet" route for designing the user garden. Firstly the memory usage and polygon count will be far lower, if i were to create a garden using the first approach from an elevated view the contents of the garden are ,and always will be, constantly visible. Away 3d only renders whats currently visible on screen so if i have a 3d object such as a sphere which is rotatable then the content at the back of the sphere wont be rendered at the same time as the content on the opposite side of the sphere so the performance level of the project should still run at a constantly high level.

In theory this would allow me to use far more polygons for the addable objects and higher detailed materials in general as only so many of them will be viewable.


Away3d stats showing the rElements (rendered elements) count of the scene.


Away3d stats showing the rElements (rendered elements) count of the exact same scene. Notice the higher amount of memory usage and the the difference in the rElement count size

Design Concept


So taking the idea further ive drawn  free hand mock ups of four different states the user would encounter on a typical journey whilst creating there garden.

The first stage depicts a very inactive inanimate planet. There will be no pre set objects on the planet such as grass,trees or animals.  At this point to help put the lifeless barren planet\garden point across to the user the colour scheme will include very dark colours only such blacks, dark greens and browns just enough to let the user know what is acually infront of them.

(Insert image)

The second stage the user will have imported in weather conditions from the map for example some heavy rain and at this point the weather will start have an effect on the planet\garden which will start to add some life to it.

(Insert image) 

The third stage the user will have started to plant trees, flowers, plants and if the weather has been used correctly they would have started to develop into interactable objects. Also theyve perhaps changed the landscape slightly to create a pond or a lake and at this point the garden will have also attracted other life to it such as birds, animals or insects.

(Insert image) 

The final stage is how i would expect the average garden\planet to look once the user had spent time developing it using the correct weather conditions over a long period of time. Hopefully portraying a massive difference to the first stage were the garden\planet looked barren.

(Insert image)

Further Thinking

The actual colour scheme of the entire site will also change depending on what stage the user had developed there garden to. Starting from a dark lifeless colour scheme working towards a bright colourful colour scheme mimicing the users creation so to speak.

Also, now that i have a concept for design i think i need to redesign the map aspect of the project, the material will need redesigning and adapting to this idea and perhaps scaling down a great deal as its currently far to large. I also need to work the map into the context of the site,  perhaps as an oribiting planet or something along those lines.


    Week Three - Map Development (Continuation)

    Map Development

    Weekly Targets

    • To create a function that refreshes the XML data at every 25th and 55th minute of every hour. 
    • To create the metric clock using the users desktop current time 

    Finalised the XML refresh function which updates the XML feeds 5 minutes after they're updated by yahoo. The five minute delay will hopefully counter act any delay that yahoo actually encounter. Yahoo update there feeds every 30 minutes at twenty minutes and fifty minutes past the hour so the feeds on my project will update at 25 minutes and 55 minutes past the hour.

    Its a fairly simple function which uses a timer event:

    var refreshTimer:Timer = new Timer(1000);
    var the_date:Date;
    var time_array:Array = [];
    var minuteCounter:int;

    refreshTimer.addEventListener(TimerEvent.TIMER, timer);
    refreshTimer.start();

    function timer(e:TimerEvent):void {

        the_date = new Date();
        time_array.push(the_date.hours + ":" + the_date.minutes + ":" + the_date.seconds);
        trace(time_array);

        if (time_array[0].indexOf(":25:0") > 0) {

            u = 0;
            trace(userMapArray);
            trace("XML Refreshed");
            loadMap();
          

        } else if (time_array[0].indexOf(":55:0") > 0) {

            u = 0;
            loadMap();
            trace("XML Refreshed");


        }
        if (time_array.length == 1) {

            time_array.length = 0 ;
        }
        minuteCounter = (((the_date.hours * 60) + the_date.minutes));
        minuteCounter.toFixed(0);

        trace(minuteCounter);

    }

    Using the date class i am able to collect the exact time from the users operating system. The function is executed every second, so each second the new date is then displayed in flash which is then stored into an array which resets itself to a length of 0 before then time is pushed into it. Because the function is triggered every second its possible to use an if statement to check the index for a certain string, for instance:

    if (time_array[0].indexOf(":25:0") > 0)

     The if statement will check for this exact entry in the array to be equal to :25:0 which is twenty five minutes and zero seconds past any hour, when it is equal to it it will execute and code, in my case the loadMap function which will reload the XML feed in flash. The major problem was that this would reload the actual movieclips used for buttons and thus cause a great deal of extra unwanted loading time. So i created a boolean which was set to false at runtime which would then change to true once the the map had been populated the first time round. If the boolean is set to true then flash would ignore the function to create new movieclips as the locations and in effect just update the RSS feeds.

    The metric clock is going to be used to position the sun and the moon and to set off specific animations which create a  day and night effect. The actual day and night effect is a simple 2d movieclip set up as the background to the users garden and for each minute of the day would animate toward either a black or blue colour. Its a fairly simple process using some basic maths:

    minuteCounter = (((the_date.hours * 60) + the_date.minutes));
    minuteCounter.toFixed(0);

    The minute counter is  equal to a very simple equation the dates hours (on a 24hr clock) multiplied by the amount of minutes in an hour plus the minutes past the hour. This would give me a number to 2 decimals points which are not needed so to remove them we simply use the toFixed command to only use the numbers up to the decimal point leaving a round figure

    I then added this to the previous prototype. The new auto refreshing version can now be found here

    This concludes the coding side of the map without any user testing upto the present development point. Ive already discovered one small bug with the mouse over on the locations which will need addressing at some point after the user testing stage.

    Sunday 7 November 2010

    Week Two - Map design and Development (Continuation)

    Map Development

    Weekly Targets 

    • Obtain all the data from the RSS feeds required for use with other parts of the site.
    • Finalise the design of the Map
    • Create a fully working prototype of the Map
      I have now developed the code to collect all the data i need to create the first prototype for the map using the exact same methods as before. I also created statements to convert the degrees of the wind direction from numbers to an actual direction such as North and South etc.

      The expanded function for loading and filtering the XML data is as follows

      function rssLoaded(e:Event) {

          trace("loaded "+ userMapArray[u][0]);

          var xml:XML=new XML(e.target.data);

          rssXML=xml.channel;

          rssXML.ignoreWhitespace = true;

          //weatherStringTest = rssXML;

          weatherString = rssXML;

          var weatherArray:Array = weatherString.split(">");

          weatherArray.splice(0,15);

          windString = weatherArray[0];
          visibString = weatherArray[1];
          conditionsString = weatherArray[33];
        
          sunString = weatherArray[2];
          sunsrArray = sunString.split(" ");
        
          sunRiseString = sunsrArray[3];
          sunSetString = sunsrArray[5];
        
          sunRiseString = sunRiseString.replace("sunrise=","");
          sunSetString = sunSetString.replace("sunset=","");
          sunRiseString = sunRiseString.replace(removeText2,"");
          sunSetString = sunSetString.replace(removeText2,"");
        
          trace(sunRiseString);
          trace(sunSetString);
        
          visibString = visibString.replace(removeText,"");
          windString = windString.replace(removeText,"");
          windString = windString.replace("/","");

          visibArray = visibString.split(" ");
          windArray = windString.split(" ");
          conditionsArray = conditionsString.split(",");

          tempString = conditionsArray[1];
          tempString = tempString.replace("F<BR /","");
          tempString = tempString.replace(" ","");
        
        
          trace(tempString);
        
          visibArray.splice(0,4);
          visibArray.splice(1,2);

          windDirString = windArray[4];
        
          if (windArray[4] == 0) {
            
              windDirString = "North";
            
          } else if (windArray[4] >1 && windArray[4] <=45) {

              windDirString = "North East";
            
          } else if (windArray[4] >45 && windArray[4] <= 90) {

              windDirString = "North East";
            
          } else if (windArray[4] > 90 && windArray[4] <= 135) {

              windDirString = "South East";
            
          } else if (windArray[4] > 135 && windArray[4] <= 180) {

              windDirString = "South";
            
          } else if (windArray[4] > 180 && windArray[4] <= 225) {

              windDirString = "South West";
            
          } else if (windArray[4] > 225 && windArray[4] <= 270) {

              windDirString = "West";
            
          } else if (windArray[4] > 270 && windArray[4] <= 315) {

              windDirString = "North West";
            
          } else if (windArray[4] > 315 && windArray[4] <= 360) {

              windDirString = "North";
          }
        
          windArray.splice(0,4);

          conditionsArray.splice(1,1);

          visibString = visibArray[0];
          windString = windArray[0];
          conditionsString = conditionsArray[0];

          userMapArray[u][6] = visibString;
          userMapArray[u][7] = windString;
          userMapArray[u][8] = conditionsString;
          userMapArray[u][9] = windDirString;
          userMapArray[u][10] = sunRiseString;
          userMapArray[u][11] = sunSetString;
          userMapArray[u][12] = tempString;

          windString = windArray[1];

          userMapArray[u][7] = windString;

          u++;

          if (u == userMapArray.length && los == false) {

              addPlaces();
              los = true;
          }
        
          if (u<userMapArray.length) {

              loadMap();
            
          }
        
      }

      The first real problem i came across with the map is populating it using the data retrieved from an XML feed. The main problem is that there is no real way i can retrieve the data "on Mass" and instead have to go through the code individually for each location. For instance if i have twenty locations on the map then flash will read the same code twenty times. This can be a time consuming process so instead of having the data from the map load every time the user wants to swop or change locations, all the data will be retrieved and stored during the loading screen at the very beginning of the users journey. This way even when the data is refreshed and updated the user wont have to undergo any waiting period each time they want to use the map.

      I have decided on parts of the final design for the map such as the functionality available to it, the panel design, creating the map object using away3d instead of blender for memory reasons and the graphic design for the map texture which is placed on the sphere. The colour scheme may change as at this stage as I'm not entirely sure on it.

      The texture for the map is a png file created in photoshop.This is just a first draft of the final design which will have each indivdual countires borders mapped onto it. The design uses some basic filter gallery editing to create the shadowing and glow effect which looks like the following:

      World Map created in photoshop


      The most conventional method of creating the map was by using a sphere, a 3d object in flash which uses a very low amount of memory compared to an object created in blender. The sphere in its basic form is simply a wire frame and needed some kind of graphical input to make it look like an actual map. Adding any type of material uses up memory so the key here was to find a solution which both looks good and doesn't put a huge burden on the frame rate by using up memory.
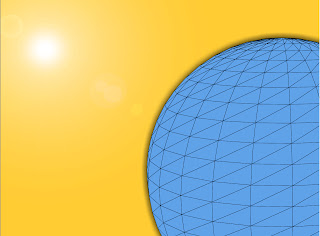

      A basic wireframe sphere

      With the graphics created it was time to start considering which method i was going to use for attaching my map png to the sphere. I started to experiment with the three major classes used for adding material to 3d objects using away3d. The first was the very simplistic colorMaterial class.Although i already knew i wouldn't be able to use my png file as material using this class i thought it would be worth experimenting with for the following reason. The ColorMaterial class lets you  adds a colour of your choice to the surface of the shape. The positives for using this is that it works perfectly with the shading classes which i intend to use on the map to represent the day and night aspect of the garden  and it uses up very little memory. The shading classes work very effectively with the color material and hopefully it works the same with the bitmapMaterial class that ive decided to use.

      Sphere with colorMaterial attached to it
      Although, after a bit more research, i decided that the bitmap class was going to be the way to go i also experimented with the movieMaterial class. This class allows you to use a regular movieclip as a texture. The major point of this is that the movieclip that's in use keeps its original 2d values but is wrapped around a 3d object. So i could actually have a 2d animation running on the movie clip on the surface of a 3d object  for example simulating the atmosphere and cloud coverage. This would also allow me to create the buttons for each location using the normal  method of adding event listeners to them to represent mouse over and mouse out effects.  So the idea was to create a bitmap and simply use a  movieclip as a holder which worked exactly as planned but its uses a massive amount of memory. The memory used using a colourMaterial added about an extra megabyte to the overall usage rate, the movieclipMaterial added about 200 megabytes to the overall usage rate and caused the frame rate to practically reach a constant 0.


      As stated this was the material class i was going to use.  The bitMapMaterial class  allows you to use an image file (jpeg,gif,png) as the material. Basically what it does is wrap the image around the 3d object, this technique doesnt have the added flexibility of the movieclipMaterial class but it would offer the same result, a 3d sphere with the map design on its surface. The image has to be an exact fit to the sphere other wise it will scale it to increase size or decrease its size. The class also allows you to smooth the material so that the image has no rough edges or any blur added to it. This was by and far the best way to go , there was little added memory so it didn't affect the frame rate, the only down side is the because the image file could be fairly large there is some loading time involved like with any image loaded into flash which will need to be taken into consideration at later date. So this is this class Ive decided to use not only for the map, but for the buttons on the map representing locations which will be mapped to a simple plane and then added to the container which holds the sphere so they all rotate in the same way.
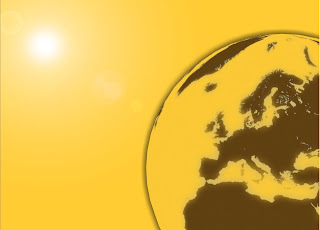

      The sphere with the bitmap applied to it


      The third and final major problem Ive had with the map this week was placing the locations onto the sphere. In conventional 2D there is only an X position and Y position to take into consideration (Horizontal and Vertical). In 3d there is still the X and Y position but there is also the Z position (Depth). So accurately pin pointing a specific position in 3D isn't as straight forward as i expected. Luckily though it is quite straight forward using away3d as they have classes called sceneX, sceneY and SceneZ which work like world coordinates in other 3d packages.  By using a simple event listener to trace back the position of the mouse click, i can retrieve the exact co ordinates of Y X and Z of the mouse position on the sphere which is inside a 3d container. 
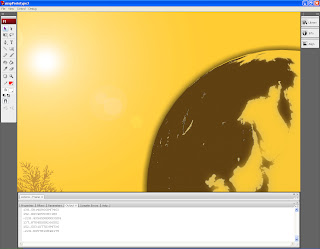
      Grabbing the X ,Y and Z coordinates and displaying them in the output panel


      With the 3d map set up  the next step is to add the locations to the sphere which the user could interact with. I decided on a simple roll over roll out effect which will show and remove a panel containing the following data 

      • Country Name
      • City Name
      • Current Conditions
      • Temperature (Fahrenheit)
      • Wind Speed
      • Wind Direction
      • Visibility
      • Sun Rise
      • Sun Set
      • Small graphic of the current weather conditions

      The panel is fairly basic in design and will have no 3d properties or values. All the data within it though is dynamic.Firstly though a simple version of this was created for testing purposes making sure that the data from the array is correct and accurate and that it functions in the correct way.
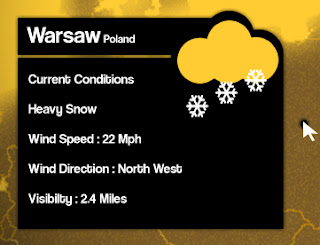
      An advanced design the of rollover location panel with data

      The final step before testing the proto type was to create a button in the 3d space, an object that the user would be able to roll lover to launch the specific panel.The buttons also had to be 3d so they would rotate when the sphere or map is rotated to keep them in position. Using the same method i used to create the texture for the sphere i simply used a bitmap of a circle as the mesh for a plane which is a two sided square object, then added extra indexes to the array to account for the X ,Y and Z positions of where the button needed to be placed on the sphere. The updated pre indexed array now looks like the following:

      userMapArray[0]=["Aberdeen","Scotland","45.97100469589326","165.26268671548647",
      "-255.60575271249087","10243"];
          
      userMapArray[1] = ["Glasgow","Scotland","56.1913383443454","156.1457014357577","-258.1154902360284",
      "21125"];
         
      userMapArray[2] =["Edinburgh","Scotland","50.13906413553286","157.39541336396513",
      "-258.96572380652304","19344"];


      The ProtoType can be found here
       

      First prototype


      Week One - Map design and Development

      Map Development

      Weekly Targets
      • Load the necessary weather RSS feeds used by the Map into flash
      • Edit and store the information extracted from the RSS feeds as a usable format
      • Create a mock up of the major functionality of the Map
      • Design the visual layout \ mock ups of the Map

      The first week i spent designing and developing  the map aspect of my project. The map is the link between the different weather conditions which the user grows there garden with. The data used to create the weather conditions is completely dynamic and are representations of  RSS weather feeds from yahoo weather.  The major goal for this week was to load the RSS feeds into flash then use that data to populate the map.


      The maps data such as the name of the location and its position on the screen for example is static data and cant be added to or changed dynamically so I've decided to store the data into an array and load the data into flash every time a user visits the site. The current data at this stage includes the locations name, the numerical code that yahoo uses to define each town or city , the X position of the location on the map and the Y position of the location on the map. An example of how the code looks for populating the array is as follows.
      userMapArray[0] = ["Aberdeen","10243","10","50"];

      Once id populated the array i started to develop the way in which the Map is going to use the the RSS XML feed. The first problem would be to create two conditions, the first which would continually loop the feed loading function , then, stop once all the necessary data had been loaded. Then a second condition to create the movieclips for each location which would be the point of interaction between the map and the user.


      The simplest technique would be to run the functions in a for loop. But whilst doing this i noticed that the for loop actually ran quicker than the speed at which flash could load in the data from the RSS feeds even though the for loop would only loop if the RSS feed had completed loading. The major problem with this is that the weather conditions were being applied to the wrong locations ,so, instead of using a for loop i simply incremented a number every time the loading code had been processed.


      function loadMap() {

          var weatherUrlLoader:URLLoader = new URLLoader();
          var weatherUrl:URLRequest = new URLRequest("http://weather.yahooapis.com/forecastrss?w="+ userMapArray[u][1]);
          weatherUrlLoader.load(weatherUrl);

          trace(weatherUrl.url);

          weatherUrlLoader.addEventListener(Event.COMPLETE,rssLoaded);

          function rssLoaded(e:Event) {

              var xml:XML=new XML(e.target.data);

              rssXML=xml.channel.item;

              xmlLength=rssXML.length();
            
              //weatherStringTest = rssXML;

              weatherString = rssXML.description;

              var weatherArray:Array = weatherString.split(">");
              weatherArray.splice(0,5);

              weatherString = "";

              weatherString = weatherArray[0];

              weatherArray = weatherString.split(",");

              weatherArray.splice(1,2);

              weatherString = weatherArray[0];

              userMapArray[u][4] = weatherString;

              weatherString = "";

              u++;

              trace(rssXML.description);

              }
          }
      }

      In the above code the URLRequest loads in a pre set string plus data which is stored in the previously created array. The array is multidimensional so each index in the array has its own secondary array. The number in the first bracket userMapArray[u] is the index in the array with the second number userMapArray[u][1] being its index in its secondary array. The index always starts at 0 so if its 1 it gives us the unique number at which the specific location is defined. For example :

       var weatherUrl:URLRequest = new URLRequest("http://weather.yahooapis.com/forecastrss?w="+ userMapArray[u][1]);
      is exactly the same as


       var weatherUrl:URLRequest = new URLRequest("http://weather.yahooapis.com/forecastrss?w="+ 10243);

      which gives me the URL of Aberdeens RSS feed. Now that the Rss Feeds were being loaded in i created two very simple if statements which looked like the following:

       if (u == userMapArray.length) {

                  addClips();

              }
            
              if (u<userMapArray.length) {

                  loadMap();
      For the first condition, if the number being incremented ever equals the length of the array it will process a function called addClips which adds movieclips to the map so the user can then interact with the it.

      For the second condition, if u is ever less than the length of the array it will always process the load function. As soon as its equal or greater to the length of the array it will ignore it. Both these statements work together just like a for loop but its far slower, giving time for the rss feeds to load appropriately to the correct location.

      Now that the feeds had been loaded i needed to manipulate the data from them.  All the information is in one node which made it slightly more difficult to obtain as opposed to them being in  separate individual nodes which i could access by the nodes name. At present the data would look look like the following:
      <img src="http://l.yimg.com/a/i/us/we/52/20.gif"/><br />
      <b>Current Conditions:</b><br />
      Fog, 50 F<BR />
      <BR /><b>Forecast:</b><BR />
      Sun - Rain. High: 55 Low: 45<br />
      Mon - AM Rain. High: 54 Low: 44<br />
      <br />
      <a href="http://us.rd.yahoo.com/dailynews/rss/weather/Milan__IT/*http://weather.yahoo.com/forecast/ITXX0042_f.html">Full Forecast at Yahoo! Weather</a><BR/><BR/>
      (provided by <a href="http://www.weather.com" >The Weather Channel</a>)<br/>
      The only part of this data i will need to use is the current condition, in this example its:
      Fog
      To retrieve the data i wanted to use i firstly stored the RSS feed  into a string and pushed the data into an array. The second step was to search for a pattern within the data, if i could find a pattern within the data i have a point at which to split the data up from. I noticed the data was put into brackets (< />) so using the > as the splitting point i cut the data up from each > and pushed that back into the array, creating a new index for the array which gave me the opportunity to access data i needed.  Finally i spliced the array to remove the data i didn't need which left me with Fog, 50 F<BR />. Using the exact same process but this time using the , as the splitting point i again cut the remaining data up, pushed it back into the array then spliced the array to remove the data i didn't need which left me with fog. All the RSS weather feeds are structured in the same way even though the data is completely different which means that no matter what the weather feed looks like ,when loaded into flash, it will always retrieve the same information. I then stored the weather condition into the appropriate array using the following code

      userMapArray[u][4] = weatherString;

      Again using the incremented number to pick out the correct index in the array and because there are only 4 levels inside each index this would be added to the 5th level.

      Now that i had created all the data i'd need at this stage i was ready to create the movieclips so the user could interact with the map and choose there desired location. Because i now have all the data loaded into flash already, using a simple for loop, i cycled through each index of the array, creating a new movieclip which would be the point of interaction between the user and the map using the details in the array as the movieclips properties such as its x and y properties. Then finally creating an event listener which when clicked would give me the URL of the main RSS feed of the clicked location which will load the data for the weather in the main application.

      function addClips() {

          for (var l:int = 0; l<userMapArray.length; l++) {

              areabtn = new Areabtn();
              addChild(areabtn);
              areabtn.x = userMapArray[l][2];
              areabtn.y = userMapArray[l][3];
              areabtn.locationNameTxt.text = userMapArray[l][0];
              areabtn.woeidTxt.text = userMapArray[l][1];
              areabtn.weatherCon.text = userMapArray[l][4];
              areabtn.name = userMapArray[l][1];

              areabtn.addEventListener(MouseEvent.CLICK,grabUrl);

      }

      The final stage of the process is to create a small visiual representation of the the RSS feed to indicate what the the weather conditions are at the currently selected lcoation. To do this i ,again, used if statements to search the index in the array looking for a pattern of letters. For example:

      if (userMapArray[l][4].search("Rain") == true) {

                  trace("It is raining in "+areabtn.locationNameTxt.text);

              }

      If the pattern in the array was equal to Rain for example it would process the code in the brackets, in this case it traces back a message but my intention for the final version of the map would be flash to load a visual indication such as an image or an animation onto the map.


      The finished code for the first protype looked like the following:

      var areabtn:Areabtn;

      var addLocationArray:Array = [];
      var userMapArray:Array = [];
      var weatherMapArray:Array = [];

      var weatherString:String = "";
      var weatherStringTest:String = "";

      var rssXML:XMLList = new XMLList();
      var xmlLength:Number;
      var u:Number = 0;

      stage.frameRate = 30;
      stage.align = StageAlign.TOP_LEFT;
      stage.scaleMode = StageScaleMode.NO_SCALE;

      //UserMapArray Layout = Name,Long\Lat,positionX,positionY

      //Scotland

      userMapArray[0] = ["Aberdeen","10243","10","50"];
      userMapArray[1] = ["Glasgow","21125","90","50"];
      userMapArray[2] = ["Edinburgh","19344","170","50"];

      //England

      userMapArray[3] = ["London","44418","239","559"];
      userMapArray[4] = ["Manchester","28218","209","501"];
      userMapArray[5] = ["Birmingham","12723","186","547"];
      userMapArray[6] = ["Cardiff","15127","490","50"];
      userMapArray[7] = ["Leeds","26042","570","495"];
      userMapArray[8] = ["Liverpool","26734","195","503"];

      //Northern Ireland

      userMapArray[9] = ["Dublin","560743","146","502"];
      userMapArray[10] = ["Cork","560472","10","150"];

      //Republic of Ireland

      userMapArray[11] = ["Belfast","44544","158","460"];

      //Portugal

      userMapArray[12] = ["Lisbon","742676","14","859"];
      userMapArray[13] = ["Porto","746203","34","791"];

      //Spain

      userMapArray[14] = ["Mardid","766273","124","842"];
      userMapArray[15] = ["Barcelona","753692","247","817"];
      userMapArray[16] = ["Sevilla","774508","64","895"];
      userMapArray[17] = ["Zaragoza","779063","186","830"];
      userMapArray[18] = ["Valencia","776688","186","865"];

      //France

      userMapArray[19] = ["Paris","615702","264","625"];
      userMapArray[20] = ["Monaco","483301","347","670"];
      userMapArray[21] = ["Lyon","609125","309","717"];
      userMapArray[22] = ["Bordeaux","580778","202","713"];
      userMapArray[23] = ["Nantes","613858","187","660"];

      //Belgium

      userMapArray[24] = ["Brussels","968019","306","583"];

      //Holland

      userMapArray[25] = ["Amsterdam","727232","410","250"];
      userMapArray[26] = ["Rotterdam","733075","490","250"];

      //Switzerland

      userMapArray[27] = ["Zurich","784794","570","250"];
      userMapArray[28] = ["Geneva","782538","650","250"];

      //Italy

      userMapArray[29] = ["Naples","719258","730","250"];
      userMapArray[30] = ["Rome","721943","10","350"];
      userMapArray[31] = ["Milan","718345","90","350"];

      //Norway oslo begren

      userMapArray[32] = ["Oslo","862592","170","350"];
      userMapArray[33] = ["Hammerfest","859348","250","350"];

      //Sweden

      userMapArray[34] = ["Stockholm","906057","330","350"];
      userMapArray[35] = ["Kiruna","895313","410","350"];

      //Finland

      userMapArray[36] = ["Oulu","568568","490","350"];
      userMapArray[37] = ["Helsinki","565346","570","350"];

      //Iceland

      userMapArray[38] = ["Reykjavík","980389","36","165"];

      //Austria

      userMapArray[39] = ["Vienna","551801","730","350"];

      trace(userMapArray);

      loadMap();

      function loadMap() {

          var weatherUrlLoader:URLLoader = new URLLoader();
          var weatherUrl:URLRequest = new URLRequest("http://weather.yahooapis.com/forecastrss?w="+ userMapArray[u][1]);
          weatherUrlLoader.load(weatherUrl);

          trace(weatherUrl.url);

          weatherUrlLoader.addEventListener(Event.COMPLETE,rssLoaded);

          function rssLoaded(e:Event) {

              var xml:XML=new XML(e.target.data);

              rssXML=xml.channel.item;

              xmlLength=rssXML.length();
            
              //weatherStringTest = rssXML;

              weatherString = rssXML.description;

              var weatherArray:Array = weatherString.split(">");
              weatherArray.splice(0,5);

              weatherString = "";

              weatherString = weatherArray[0];

              weatherArray = weatherString.split(",");

              weatherArray.splice(1,2);

              weatherString = weatherArray[0];

              userMapArray[u][4] = weatherString;

              weatherString = "";

              u++;

              trace(rssXML.description);

              if (u == userMapArray.length) {

                  addClips();

              }
            
              if (u<userMapArray.length) {

                  loadMap();

              }
          }
      }

      function addClips() {

          for (var l:int = 0; l<userMapArray.length; l++) {

              areabtn = new Areabtn();
              addChild(areabtn);
              areabtn.x = userMapArray[l][2];
              areabtn.y = userMapArray[l][3];
              areabtn.locationNameTxt.text = userMapArray[l][0];
              areabtn.woeidTxt.text = userMapArray[l][1];
              areabtn.weatherCon.text = userMapArray[l][4];
              areabtn.name = userMapArray[l][1];

              areabtn.addEventListener(MouseEvent.CLICK,grabUrl);

              if (userMapArray[l][4].search("Rain") == true) {

                  trace("It is raining in "+areabtn.locationNameTxt.text);

              } else if (userMapArray[l][4].search("Fair") == true) {

                  trace("It is fair in "+areabtn.locationNameTxt.text);

              } else if (userMapArray[l][4].search("Partly Cloudy") == true) {

                  trace("It is partly cloudy in "+areabtn.locationNameTxt.text);

              } else if (userMapArray[l][4].search("Mostly Cloudy") == true) {

                  trace("It is mostly cloudy in "+areabtn.locationNameTxt.text);

              } else if (userMapArray[l][4].search("Light Rain Shower") == true) {

                  trace("It is raining lightly in "+areabtn.locationNameTxt.text);

              } else if (userMapArray[l][4].search("Drizzle") == true) {

                  trace("It is drizzling in "+areabtn.locationNameTxt.text);

              } else if (userMapArray[l][4].search("Light Drizzle") == true) {

                  trace("It is drizzling lightly in "+areabtn.locationNameTxt.text);

              } else if (userMapArray[l][4].search("Cloudy") == true) {

                  trace("It is cloudy in "+areabtn.locationNameTxt.text);

              } else if (userMapArray[l][4].search("Fog") == true) {

                  trace("It is foggy in "+areabtn.locationNameTxt.text);

              } else if (userMapArray[l][4].search("Light Rain") == true) {

                  trace("It is raining lightly in "+areabtn.locationNameTxt.text);

              } else if (userMapArray[l][4].search("Light Rain/Windy") == true) {

                  trace("It is raining lightly in "+areabtn.locationNameTxt.text);

              }

          }
      }

      function grabUrl(e:MouseEvent):void {

          trace("http://weather.yahooapis.com/forecastrss?w="+e.target.name);
        

      }

      An image showing the prototypes functionality at its present point ,  loading data from an array and a basic use of the RSS feed on a simple 2d map. Link to the live version here


      A dummy run of the map with some basic functionality


      Map Design

      Some early versions of how i want the map to look. The map is going to be a 3d object which the user rotates by holding down the mouse button and dragging the mouse on the stage. Also shows some basic functionality, in this case, what happens when a location is moused over.